Feeds:
Posts
Comments

Archive for the ‘EDD’ Category

We’re excited to bring a significant refresh to the Discovery Cloud experience.  The updates add clarity to your review at the Reviewer and Subreview levels and provide visibility into where progress is being made or where it may be lacking.  The ability to more clearly differentiate between documents that are not yet reviewed for privilege and those that have been positively identified as “not privileged” facilitates privilege review in a way that was previously inconvenient.


Subreview Metrics

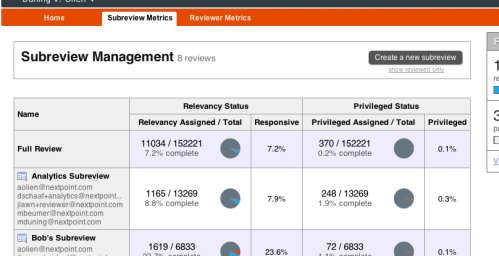
Available to Advanced-level users, a tab under “Admin” brings you status and counts at the Subreview level.

substat

Subreview level statistics illustrate progress and may provide insight on what area of your review is producing the highest quantity of relevant/privileged/etc documents.  Many graphs may be clicked to gain an extra level of detail.


Reviewer Metrics

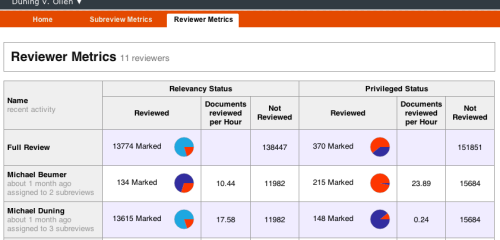
Available to Advanced-level users, a tab under “Admin” brings you status and counts at the Reviewer level.

reviewstat

Statistics for each Reviewer provide visibility on what sort of work is being accomplished.  If you elect to utilize the (new) Timekeeper functionality, a time metric is also available to give an indicator of review speed.  As with Subreview Metrics, many graphs may be clicked to gain an extra level of detail.


Reporting

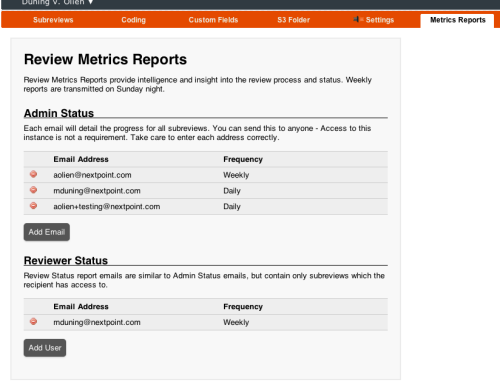
Available via Settings -> Metrics Reports, users may opt-in to status emails.  A report will be generated and transmitted weekly, providing the recipient with the overall +/- subreview status of the review.  These emails do not need to be tied to a Nextpoint account, freeing you up to transmit them to addresses of those not necessarily involved in the day-to-day review.

reportsign


Independent Privilege and Relevancy Review

Previously known as “Review Status”, “Relevancy Status” is concentrated on the relevant/not portion of a review.  On the Privilege side, this enables differentiation between a document that is “not reviewed for privilege” and a document that has been reviewed for privilege and certified to truly be “not privileged”.

Existing documents with a “Not Privileged” status have been marked as “Not Reviewed” for privilege.  If you would prefer that those documents instead be “Not Privileged” – a simple bulk edit is all that is necessary to make that modification en masse.


So, when do I get it?

The update will be available to some users beginning Tuesday 3/19, with the remainder receiving the updates Thursday, 3/21.  As with all updates, no action is necessary on your end.
Read Full Post »

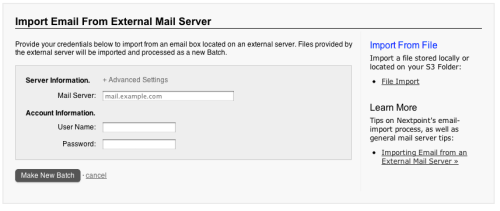
Importing email from an external mail server saves you time normally spent creating, exporting, and uploading mailbox files.  Enter your email configuration and credentials (similar to any email client) and you’re on your way to importing all mail available in the mailbox.

mail-tight

Following authentication, all emails and attachments provided by the external server will be imported similar to normal “batch” processing.  Relationships between emails and attachments will be established and the documents will be imaged as normal.

This feature is immediately available to all users of Trial Cloud and Discovery Cloud.

Read Full Post »

The next time you login to your Nextpoint account, you may notice some fresh new icons.

Available to existing Nextpoint customer’s, Privilege Protect expands previous document, deposition, and transcript transferring capabilities.  New features and customizations combine to make this the most powerful and convenient document production tool available.  Official public release will be coming in September 2012.

To get started, simply search to isolate documents and select the Privilege Protect icon.

Then configure your transfer.

If the target of your transfer is a 3rd party, additional checks and balances will be made available to ensure safety and sanctity of data.
Some notable options:

  • Selecting a recipient.  Transferring to 3rd party recipients (who are existing Nextpoint clients themselves) requires a PIN be setup and communicated between the 2 parties, not only providing reassurance that you are transferring to the correct recipient, but also that the 3rd party’s privacy is protected.
  • Privilege Detection [Discovery Cloud only].  Privilege Detection compares documents you’ve elected to transfer with those that you have previously identified as privileged and/or have redacted.  A report is generated bringing potential leaks to light, allowing you to double check suspicious documents before they may have been erroneously transferred to a 3rd party.
  • Loadfile Review.  To reassure you that the data transferred will be exactly what you have anticipated – nothing more, nothing less – you are afforded the opportunity to review the actual loadfile that will be used for the transfer.  Search this file for key phrases, email addresses, or anything else that may be a red flag that an undesired document or meatadata would have otherwise been transferred.
  • “Smart Override” for native document transfer.  Blocking documents that are privileged from production is critical, but what if a native email (which is not itself marked as privileged) were transferred – containing the data necessary to re-create a privileged Word Doc that had been an attachment?  Smart override works to detect this situation and prevent transmission, instead opting to transfer images of the document in question.

Nextpoint Privilege Protect is available now to existing Nextpoint customers, allowing you to produce without ever leaving our toolset.  No harddrives to inventory and worry about going astray in the mail.  We hope you get a lot of benefit and use out of this tool and look forward to hearing your feedback.

Read Full Post »

We are excited to announce new options for crawling Facebook. We have added the ability to crawl profiles anonymously, crawl friends’ profiles, and crawl age and country restricted pages. Also, in an effort to make crawling Facebook easier we have combined page and profile crawl creation.

We now offer the option to crawl a Facebook profile anonymously. This will allow you to capture a Facebook profile’s information that is available to all Facebook users. You can do this by simply entering the address of the profile you want crawled, then selecting the “Anonymous User” option for who to crawl as. Simply complete the form and we will begin crawling. If you need to capture more information than is available publicly, and are unable to get the user’s credentials, we have added an option for that also.

You now have the ability to crawl friends and other profiles as they are available to you or anyone else who is willing to authorize the use of their credentials. This can be done by entering the address of the profile you want to crawl then selecting either the “Enter Facebook credentials” or “Email other Facebook User for credentials” options and proceed with authentication. We will then begin crawling the specified profile as if we were the user who authorized the crawl.

Facebook fan pages can be restricted based on the age and country of the viewing user. You can now crawl these restricted pages by selecting to crawl the feed with Facebook credentials that have the proper permissions to view these pages. When creating the feed, select either the “Enter Facebook credentials” or “Email other Facebook User for credentials” option and proceed with authentication. Once authentication is completed we will be able to crawl the page as if we were viewing the page as the authenticated user.

In addition, you no longer need to know if you are crawling a Facebook fan page or a Facebook profile. You can create crawls for both using the same process. Simply select the “Facebook Feed” options from the “Add a New Website or Social Network Account” dropdown menu. From here you can simply enter the ID of the Facebook object you want to crawl, select who you want to crawl the object as (more on this later), then fill out the remained of the options just as before. After authorization, if it is required, we will start crawling Facebook.

We hope the streamlining of the Facebook Feed setup will save you time when setting up new feeds. And we hope these new features will allow you to capture all the Facebook information you need.

Read Full Post »

Nextpoint’s TrialCloud and DiscoveryCloud software now supports importing files directly from EnCase evidence files (E01) and Apple Disk Images (dmg) for all common disk formats — Windows XP, Windows 7, and Mac OS X.

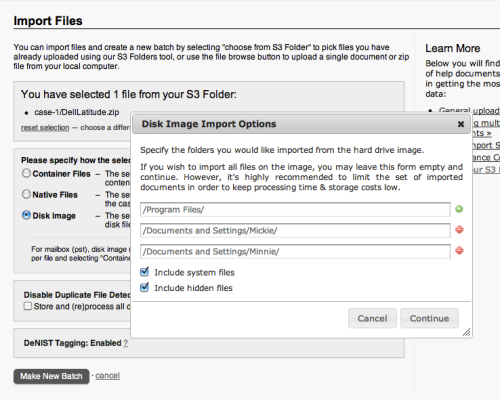
On the import screen, you’ll now find a Disk Image import type, enabled when a valid disk image file has been selected from your S3 folder. These may be single files or multiple split-image files contained in a zip. When this option is used, the uploaded hard drive will be extracted in place and the files it contains will be imported directly from the image as though they’d been opened and imported separately.

Disk Image Upload

At import time, a specific set of files and directories to import may be defined in order to narrow the scope of the uploaded data and avoid processing large amounts of uninteresting documents. Additionally, for disk formats that support it, you may choose to include or exclude system files (those bundled with the operating system itself rather than created by a user, potentially uninteresting during review) and hidden files (most often application preferences and filesystem metadata).

These options, in combination with our DeNIST file filtering feature, allow you to focus in on the important documents from your collected evidence files quickly and easily.

Read Full Post »

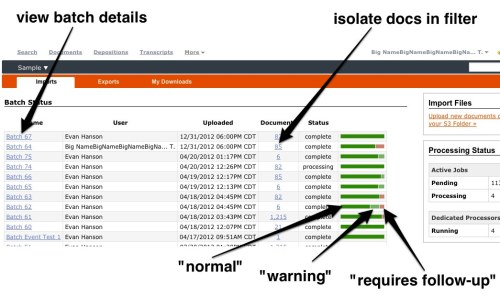
Import status (“Batch” documents upload) in DiscoveryCloud and TrialCloud has been updated to streamline reporting and enhance issue detection and handling.

The “batch list” page has a simplified look, allowing 2x the previous quantity to be conveniently displayed at a time, along with quick visual cues to make statuses obvious at a glance.  The status-bar provides a visual diagnostic of processing results for each batch.  Click on a section of the bar to view the corresponding portion of the processing logs.


Marking a batch as “Resolved” will update it’s status and gray out the status bar to make it a little less eye catching.


Remembering that “Batch 9” is the zip of files you found on Terry’s PC is a bit of a pain.  Providing a name for the batch gives you a handy moniker to be used throughout the interface.

Batch Status Reporting

Available when your batch has completed:  Download a full report of actions or the specific actions you are interested in (i.e. only the documents/issues that recommend follow-up action to be taken).


The link for “Normal” actions only is pictured above – To download only the “Warnings” for example, a similar link may be found on the “Warnings” tab.

The download is a csv listing the actions taken and (where available) links to the related document in the interface, providing you with a convenient starting point for resolving any issues encountered.


We’re excited about what these changes immediately bring to the table for Batch-status reporting and error resolution, as well as the future enhancements these underlying changes will enable in the future.

Read Full Post »

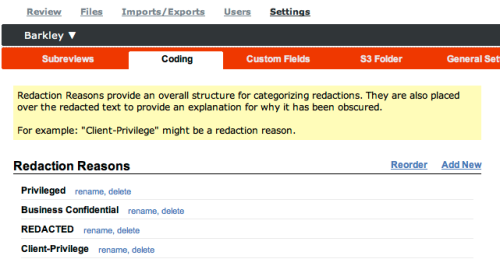
DiscoveryCloud now provides the ability to choose and configure your own redaction stamping text, giving you the flexibility to use the labels that make sense for you.

Advanced users may add, remove, rename, and sort Redaction Reasons in the Settings section.

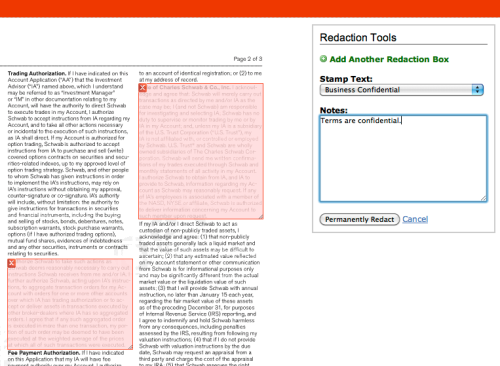
Redaction Reasons are immediately available for selection in the normal redaction interface.

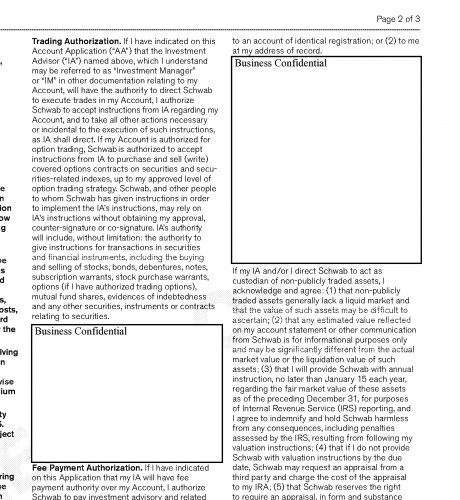
Processing completes a few seconds later, leaving a redacted box containing the desired text.

The ability to customize redaction text puts the power to provide clarity (or ambiguity) in your hands, allowing you to craft the solution to fit your specific situation.

Read Full Post »

As mentioned in our Introducing Coding Templates post, Confidentiality Codes have arrived in DiscoveryCloud.  The codes are fully customizable & sortable in the settings section or via the “Edit Template” link when reviewing documents.

When reviewing documents, apply any applicable codes to mark and automatically stamp them.  It’s quick and easy and won’t interfere with any bates stamping on the documents.

Read Full Post »

Efficiency is king in document review.  You need tools that put what you need in front of you and then get out of the way.  Customizable Coding Templates bring you that power.  Set responsive, privileged, and confidentiality statuses that make sense for this task without the need for codes that you’re not going to use this time out.  Promote coding fields to your template, making them available quickly and easily to eliminate the need for hunting them down.

The new Related Documents section gives users the ability to apply any necessary changes to this document along with any that are in this email thread, md5 matches, etc. without the need to leave the document-view page.

Confidentiality Codes are stamped on your documents as you proceed.  No need to kick off the process later: simply set them now and they’ll be on the copy you produce.  Stay tuned for a more detailed post on confidentiality codes and how to use them.

The new “Update & Next” button lets you apply your changes and move-on; reducing click counts and adding efficiency.

Putting the ability to design the coding fields template in your hands, allows you to customize the tool to your own needs.  It will reduce mouse-clicks and visual scanning, increasing not only speed of the review, but accuracy & convenience.

Read Full Post »

Today we launch Saved Search for TrialCloud, DiscoveryCloud, and CloudPreservation, bringing you easily repeatable (and sharable) searches.

Execute a search to ensure your syntax is correct before clicking the Save Search icon.


Anyone can save a search for themselves.  Advanced users can publish searches to everyone (“public”).


At any time in the future, select a previously saved search to re-execute the search and view the updated results via the same Save Search icon.


Saved Search provides the convenience of repeatable searches in an easily shared form.  We hope you get a lot of mileage out of them.

Read Full Post »

Older Posts »